Precisa de suporte remoto em T.I? Entre em contato, 80 reais a conexão, cobramos apenas se resolver! WhatsApp (11 999746088)
sábado, 30 de novembro de 2019
quinta-feira, 28 de novembro de 2019
script bat para fechar arquivos abertos
Segue documentação abaixo:
ou
####Script .BAT
@echo off
net files > ArquivosAbertos.txt
for /F "delims= " %%a in ('type ArquivosAbertos.txt ^findstr "*.*"') do (
Net Files %%a /close
)
###
@echo off
net files > ArquivosAbertos.txt
for /F "delims= " %%a in ('type ArquivosAbertos.txt ^findstr "*.*"') do (
Net Files %%a /close
)
###
Espero que ajude.
https://social.technet.microsoft.com/Forums/pt-BR/7a9bbc62-ea95-49d0-b307-507167898ce3/script-fechar-arquivos-abertos?forum=winsrv2003ptPrecisa de suporte remoto em T.I? Entre em contato, 40 reais a conexão, cobramos apenas se resolver! WhatsApp (11 999746088)
quarta-feira, 13 de novembro de 2019
Não ajustar a opção padrão para 'Instalar Atualizações e Desligar' na caixa de diálogo Desligar o Windows
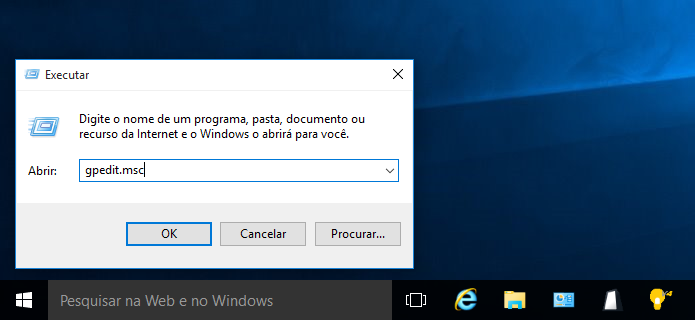
executar: gpedit.msc
 Abra o editor de polícias locais (Foto: Reprodução/Helito Bijora)
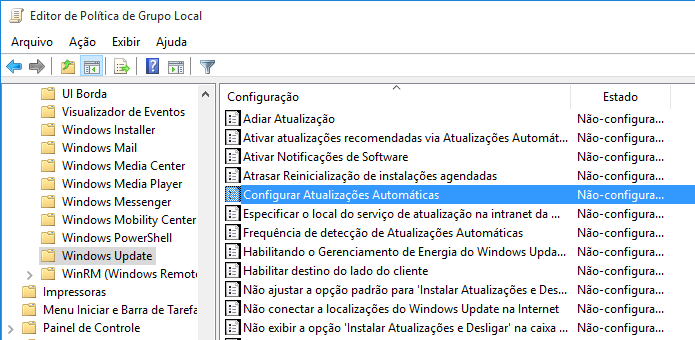
 Acesse a chave relacionada ao Windows Update (Foto: Reprodução/Helito Bijora)
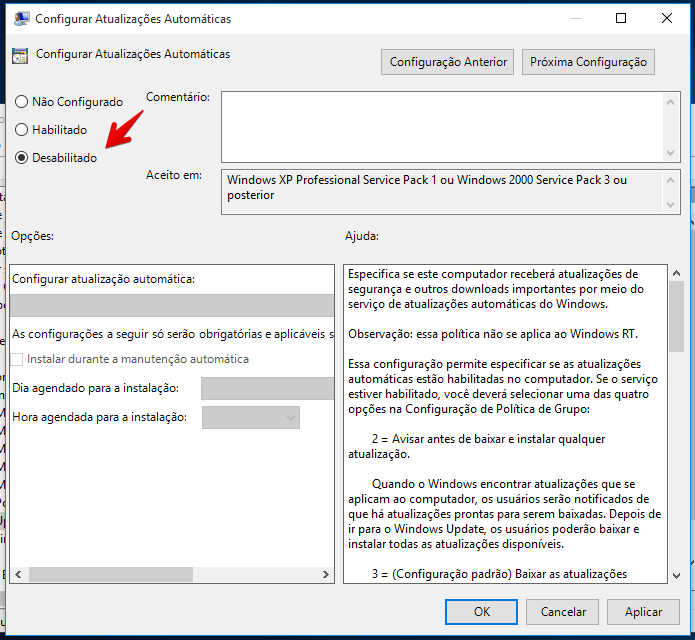
 Desativando o Windows Update por completo (Foto: Reprodução/Helito Bijora)
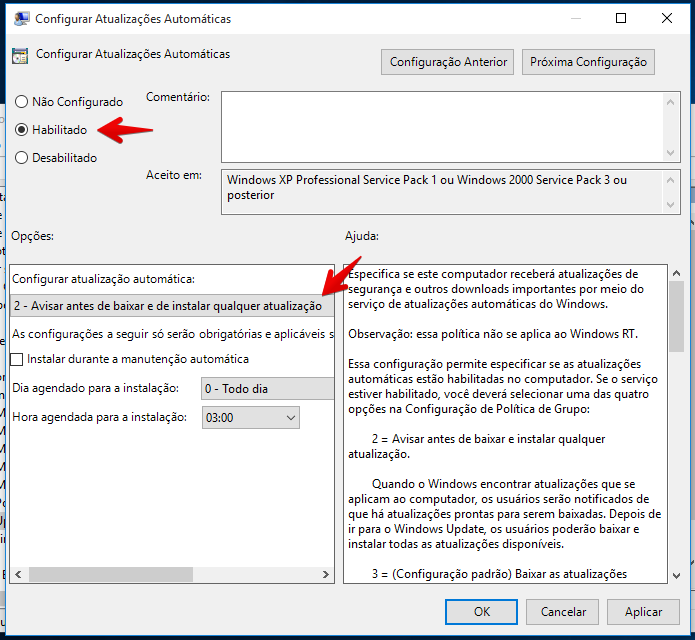
 Ativando o alerta de atualizações (Foto: Reprodução/Helito Bijora)
Precisa de suporte remoto em T.I? Entre em contato, 40 reais a conexão, cobramos apenas se resolver! WhatsApp (11 999746088)
Passo 1. Pressione “Windows + R” para abrir o “Executar” e entre com o comando “gpedit.msc” (sem as aspas);
 Abra o editor de polícias locais (Foto: Reprodução/Helito Bijora)
Passo 2. Na lateral esquerda da janela, expanda as chaves “Configuração do Computador”, “Modelos Administrativos”, “Componentes do Windows” e “Windows Updade”;
 Acesse a chave relacionada ao Windows Update (Foto: Reprodução/Helito Bijora)
Passo 3. Na parte direita da tela, clique duas vezes sobre “Configurar Atualizações Automáticas”. Por fim, marque a opção “Desabilitado” e pressione “OK”;
 Desativando o Windows Update por completo (Foto: Reprodução/Helito Bijora)
Passo 4. Caso queira desativar a atualização automática e apenas ser alertado sobre novas atualizações, selecione “Habilitado” e, logo abaixo, escolha “Avisar antes de baixar e instalar qualquer atualização”.
 Ativando o alerta de atualizações (Foto: Reprodução/Helito Bijora)
Pronto! Com essa dica simples, o Windows 10 não instalará novas atualizações sem o seu consentimento.
Precisa de suporte remoto em T.I? Entre em contato, 40 reais a conexão, cobramos apenas se resolver! WhatsApp (11 999746088)
Baixar atualizações do windows manual
http://www.catalog.update.microsoft.com/home.aspx
Precisa de suporte remoto em T.I? Entre em contato, 40 reais a conexão, cobramos apenas se resolver! WhatsApp (11 999746088)
Precisa de suporte remoto em T.I? Entre em contato, 40 reais a conexão, cobramos apenas se resolver! WhatsApp (11 999746088)
quinta-feira, 7 de novembro de 2019
Histórico de atualizações do office 2016 2019
https://docs.microsoft.com/pt-br/officeupdates/update-history-office-2019
Precisa de suporte remoto em T.I? Entre em contato, 40 reais a conexão, cobramos apenas se resolver! WhatsApp (11 999746088)
Precisa de suporte remoto em T.I? Entre em contato, 40 reais a conexão, cobramos apenas se resolver! WhatsApp (11 999746088)
quarta-feira, 6 de novembro de 2019
link para baixar windows original
https://support.microsoft.com/en-us/help/15088/windows-10-create-installation-media
Precisa de suporte remoto em T.I? Entre em contato, 40 reais a conexão, cobramos apenas se resolver! WhatsApp (11 999746088)
Precisa de suporte remoto em T.I? Entre em contato, 40 reais a conexão, cobramos apenas se resolver! WhatsApp (11 999746088)
Mapear unidade pelo GPO windows server 2012
This tutorial will show you how to create a GPO on Windows server to map network drive automatically.
The domain controller is running Windows 2012 R2.
The domain computers are running Windows 7 and Windows 10.
Hardware List:
The following section presents the list of equipment used to create this Windows tutorial.
Every piece of hardware listed above can be found at Amazon website.
Windows Related Tutorial:
On this page, we offer quick access to a list of tutorials related to Windows.
Tutorial - Creating a GPO to Map Network Drive
Click on the Start menu, locate and open the Group Policy Management tool.

On the Group Policy Management screen, locate the folder named Group Policy Objects.
Right-click the Group Policy Objects folder and select the New option.

Enter a name for your new policy.

In our example, the new GPO was named: MAP NETWORK DRIVE.
On the Group Policy Management screen, expand the folder named Group Policy Objects.
Right-click your new Group Policy Object and select the Edit option.

On the group policy editor screen, you will be presented to User configurations and Computer configurations.
We will change the User configurations to automatically map a shared folder as a network drive.
We don't need to change any computer configuration.
On the group policy editor screen, expand the User configuration folder and locate the following item.
• User Configuration > Preferences > Windows Settings > Drive Maps
Right click on the Drive Maps option and select the New > Mapped drive option.

On the new window, enter the following information:
• The shared folder path to which the network drive should automatically be mapped.
• A label to the network drive.
• Select the drive letter to the new network drive.

Click on the Ok button to finish the configuration.
To finish the group policy creation you need to close the Group policy editor window.
Only when you close the group policy window, the system will save your configuration.
In our example, the shared folder \\TECH-DC01\SHARED will be automatically mapped as drive S.
Tutorial - Applying the GPO to Map a Network Drive
You have finished the creation of the require GPO to map the network drive automatically.
But, you still need to enable the use of your new Group Policy.
On the Group policy management screen, you need to right-click the Organizational Unit desired and select the option to link an existent GPO.

In our example, we are going to link the group policy named MAP NETWORK DRIVE to the root of our domain named TECH.LOCAL.

After applying the GPO you need to wait for 10 or 20 minutes.
During this time the GPO will be replicated to other domain controllers that you might have.
After waiting 20 minutes, you should reboot a user's computer.
During the boot, the computer will get and apply a copy of the new group policy.
To test the configuration, you need to login on a domain computer and verify if the network drive was automatically mapped.
On My computer screen, the net network drive should be presented as drive S.
Precisa de suporte remoto em T.I? Entre em contato, 40 reais a conexão, cobramos apenas se resolver! WhatsApp (11 999746088)
Bloquear arquivos de aplicativos de diretiva de grupo domínio
Group Policy Application Locker Configuration
This tutorial will show you how to configure group policy application locker on Windows 2012 server.
This tutorial will show you how to block all applications installation or execution.
This tutorial will show you how to allow a specific application to run.
This will help your computer environment in compliance with international information security certifications like ISO 27001.
The domain controller is running Windows 2012 R2.
The domain computers are running Windows 7 and Windows 10.
Application locker will work on Windows Enterprise or Ultimate edition.
Application locker will not work on Windows professional edition.
Hardware List:
The following section presents the list of equipment used to create this Windows tutorial.
Every piece of hardware listed above can be found at Amazon website.
Windows Related Tutorial:
On this page, we offer quick access to a list of tutorials related to Windows.
Tutorial - Creating the Application Locker GPO
The following tasks were executed on a domain controller running Windows 2012 R2 with Active directory.
Click on the Start menu, locate and open the Group Policy Management tool.

On the Group Policy Management screen, locate the folder named Group Policy Objects.
Right-click the Group Policy Objects folder and select the New option.

Enter a name for your new policy.

In our example, the new GPO was named: SOFTWARE POLICY.
On the Group Policy Management screen, expand the folder named Group Policy Objects.
Right-click your new Group Policy Object and select the Edit option.

On the group policy editor screen, you will be presented to User configurations and Computer configurations.
We will change only the Computer configurations.
We don't need to change any User configuration.
First, we need to configure the Windows service named Application Identity to start automatically.
On the group policy editor screen, expand the Computer configuration folder and locate the following item.
• Computer Configuration > Windows Settings > Security Settings > System Services

On the right, the list of available services for Windows will be presented.

Double click the configuration item named Application Identity.
On the configuration item screen, you need to select the Automatic option.

In order to the Application locker to work the domain computers need to have the Application identity service running.
Tutorial - Configuring the Application Locker GPO
On the group policy editor screen, expand the Computer configuration folder and locate the following item.
• Computer Configuration > Windows Settings > Security Settings > Application Control Policies> AppLocker

On the right, the configuration items available for the Application locker policy will be presented.

Click on the configuration item named Configure Rule enforcement.
The Applocker properties window will be presented.

Enable the Executable rules and select the Enforce rules option.
Enable the Windows Installer rules and select the Enforce rules option.
Enable the Packaged App rules and select the Enforce rules option.
Click on the OK button.

Next, we need to create the default software rules.
Right-click on the Executables Rules policy and select the Create default rules option.
To finish the group policy creation you need to close the Group policy editor window.
Only when you close the group policy window, the system will save your configuration.

The executable default rules state the following:
Every EXE file inside the Windows folder is allowed to be executed.
Every EXE file inside the Program files folder is allowed to be executed.
The Administrators group members are allowed to execute any EXE file.
To authorize another application, right-click on the Executable rules and select the Create new rule option.

Right-click on the Windows installer Rules and select the Create default rules option.
To authorize another application, right-click on the Windows installer rules and select the Create new rule option.

Right-click on the Package App rules and select the Create default rules option.

To finish the group policy creation you need to close the Group policy editor window.
Only when you close the group policy window, the system will save your configuration.
Tutorial - Applying the Application Locker GPO
You have finished the creation of the Application locker GPO.
But, you still need to enable the use of your new Group Policy.
On the Group policy management screen, you need to right-click the Organizational Unit desired and select the option to link an existent GPO.

In our example, we are going to link the group policy named SOFTWARE POLICY to the root of our domain named TECH.LOCAL.

After applying the GPO you need to wait for 10 or 20 minutes.
During this time the GPO will be replicated to other domain controllers that you might have.
After waiting 20 minutes, you should reboot a user's computer.
During the boot, the computer will get and apply a copy of the new group policy.
To test the configuration, you need to login on a domain computer, download any software and try to run it.
Your computer should automatically block any application that is not specifically allowed on the GPO to run.

Precisa de suporte remoto em T.I? Entre em contato, 40 reais a conexão, cobramos apenas se resolver! WhatsApp (11 999746088)
Assinar:
Comentários (Atom)